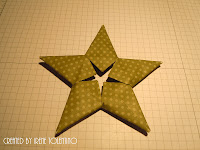
A search on the internet yielded a lot of ideas and I went with modular money origami star found HERE. Tobias has a great tutorial and I was able to make a star in no time. I didn't have origami paper and I didn't want to run out and get some just for this project. I rummaged through my stash of paper and decided on a double sided olive green patterned paper. Not too heavy and not flimsy either.
I'm not including instructions here for the star because Tobias' tutorial covered all the bases and is excellent. One thing I would like to mention is if you decide to use regular patterned paper is to make sure you use a bone folder to burnish all the folds. And I found that the more I burnish the softer and more pliable the paper became and that helps avoid tearing the edges.
Another thing is measurement. I used 6" x 2-5/8" pieces to minimize scrap papers since most of my patterned papers are 12" x 12". The star ended up to be about 4.75" x 4.75" too big for a standard A2 card. My card measures 6" x 5". Here's the front and back of the finished star.
Obviously I want the star to stand out so the card layout is really simple but I went all out with the blings. The star reminded me of the traditional holiday decorations in the Philippines called parol. They're usually colorful and bright, see pictures below. The picture of my card is not the best but you get the idea.
These are a few of the parols from the Philippines.

This is the more traditional one.

I enjoyed making all the cards for this series but I'm ready to do something else. Stay tuned to find out what I tackle next.
Until the next post.............. Cheers!!!


 posted
  posted
  posted
  posted
  posted
  posted
  posted
  posted
  posted
 posted
  posted
  posted
  posted
  inside, gift card holder
 posted
  posted
  posted
  posted
  posted


