Wednesday, January 30, 2013

Swallowtail - Triple Time Stamping Part 2

I'm still playing with the Swallowtail stamp.  This time I got the standard measurements for the different panels.  It's fun picking color combinations to make the butterfly "flutter" on paper.

The picture instructions and measurements for this technique are towards the end of the post.  I'll start with the samples which were all stamped with black pigment ink and heat embossed with clear embossing powder.

The first card is one of my favorite color combinations - navy blue and bright green.  In Stampin'Up world those colors are called Night of Navy and Lucky Limeade.  The image was colored with Lucky Limeade, Marina Mist and Midnight Muse inks.  The background was sponged with Lucky Limeade and the background images were stamped in Marina Mist ink.  The sentiment was heat embossed in white embossing powder on Lucky Limeade card stock.


For the next card I used Rich Razzleberry card stock and Pool Party ink.  On this card, I sponged Pool Party ink all over the panels.  Easy peasy!  I stamped the sentiment with Rich Razzleberry ink and hand cut just the word Love.  It's hard to see on the picture but I also stamped hearts on the background using Pool Party ink.  I love these two color together.


And the last card was made with Cajun Craze card stock.  I colored the image with Daffodil Delight and Cajun Craze inks.  I stamped hearts and the word Love on the background with Daffodil Delight ink.


Now onto the instructions.  You will need three panels cut from light colored cardstock, white or ivory are ideal.  You will also need a base card and two mats cut from your choice of cardstock, pictured in green here.  My panel measurements are 5-1/4" x 4", 4-1/4" x 3" and 3-1/4" x 2".   My card is 11" x 4-1/4" folded in half.  The mat measurements are 4-1/2" x 3-1/4" and 3-1/2" x 2-1/4".  If your card is a different size, adjust your panel and mat measurements accordingly


Apply removable tape to the back of your panels and stack them evenly like the picture below.

Stamp your image or images onto the stacked panels.  Don't worry about the "break" between the panels, the mats will cover those.  Color your image, if needed, while the panels are still glued together.

Separate the panels and attached each panel to the base card and mats.  

Make sure your matted panels are oriented properly when you assemble them.  Your image or images should match seamlessly.

This was a fun and easy technique to do.  I'm glad I finally got around to trying it.

Hope my instructions are clear and you won't have trouble making your own card using this technique.

Thanks for stopping by today.

Cheers!!!

irene


All supplies used are from Stampin'Up.

Monday, January 28, 2013

Swallowtail Card - Triple Time Stamping Technique

I went through a phase where everything I made had butterflies on them.  As a result, I have all kinds of butterfly stamps, dies and punches.  I actually haven't touch any of them in like a year or so.  And then Stampin'Up came up with the Swallowtail stamp in their Spring catalog and I'm hooked all over again.

Last summer a technique called triple time stamping was so popular everyone was doing it.  I wanted to try it but the holidays rolled in so fast I never got around to doing one.  When I saw the Spring catalog preview, I knew the Swallowtail stamp is perfect for this technique (at least for me).

Once I started playing with it I couldn't stop.  These are the two samples I have for today.

The first one is a simple black and white with a pop of red.  I added a gray ribbon, too,


The second one is the triple time stamping technique.  I cut my card stock from memory and it turned out I was way off.  I did mine in a quarter inch increment and it should have been an inch increment.  But it's a "happy" mistake because I was able to highlight a bigger image of the swallowtail.

I stamped the Swallowtail in black craft ink and heat embossed using clear embossing powder.  Then I sponged Summer Starfruit all over the image and border.  Next I sponged Primrose Petal in areas where I want some pink to stand out and blended the two colors together.  Some of the blended colors came out orangy.  The base card and mats are Old Olive card stock.


I will include a more detailed instructions on my next post which will feature more cards using the same technique.

Stay tuned for more Swallowtail and Triple Time Stamping technique.

Cheers!!!

irene


All supplies used were from Stampin'Up.

Stamps: Swallowtail, Vintage Verses, Perfectly Penned
Card stock:  Whisper White, Basic Black, Red Glimmer Paper, Old Olive
Ink:  Black Craft Ink, Summer Starfruit, Primrose Petal
Embellishments:  Ribbon, rhinestones

Sunday, January 27, 2013

Valentine Square Collage Frame

I finally got my Valentine square swaps in the mail the other day but didn't get a chance to frame them until now.  This time I have a frame on hand since I've kept my eyes open for picture frames on sale over the holidays.

My swap was posted HERE.  Funny how the swaps are all so similar but none are exactly the same.  And they all complement my striking embellishment - the red heart die cut felt.


A few weeks ago when I was organizing my work area for the new year, I found packs of self adhesive strips of felt with different colors and die cuts.   Red hearts, blue stars, yellow, pink and purple flowers.  I used the red heart die cuts for this frame collage.  Unfortunately, I wasn't able to fit all the squares in the frame.  Two squares were not included.

Here's a close up look.


The next square swap theme is Easter/Spring.  This will be really interesting as the theme could produce a myriad of designs.  I think I'm going with the spring theme - lots of flowers.

Thanks for stopping by.  Until next time ............. Cheers!!!

irene

Saturday, January 26, 2013

Happy Hello Die Cut Cards

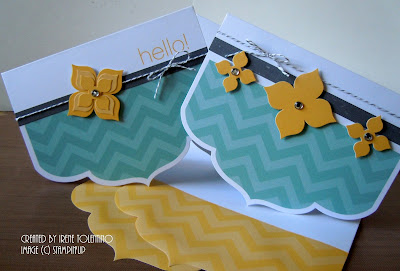
January 22nd was the kick off of Stampin'Up's Sale-A-Bration (SAB) event.  Today I'm sharing one of the free items you get during SAB.   This is one of the two prizes I won at our recent group meeting, it's called Happy Hello card kit.  Included in the kit are eight die cut cards and envelopes, flowers and strips stickers, baker's twine and rhinestones.


The card on the left was made following the kit design.  Real simple and quick card.  On the other one I used the same embellishments but changed the layout a little bit.


You can also use the pretty die cut card and add your own embellishment which I plan on doing with the rest of the cards.

Thanks for stopping by today.  Until the next post ................  Cheers!!!


Tuesday, January 22, 2013

January Meeting Projects

Today I'm sharing the three fun projects we made at our recent group meeting.  

The first one was a tunnel card.  The front is just your basic card but then you open it and WOW!


Here's the inside look.  I'm excited to try this out with different shape dies for the "window". 

Another angle.

The next project was a trifold card with a twist.  The "love" tag is the "latch" that keeps the card close. 


This is how it looks when the card is open.


The last one was a card made with the Happy Hello card kit.  The same kit I won as a door prize.  I love the die cut card.  We embellished the card with the adorable Dress Up framelit dies, Delicate Details lace tape and the Flower Trim which you can color to match your project.  


It was fun playing with all these new items from the Spring and Sale-a-Bration catalogs.  The problem is when you see them on the catalogs you think 'that's nice' and you move on but once you've touched them and used them, that thinking changes to 'I need that or I want that'!  That's how I feel about the Dress Up dies. LOL!

If you need additional information on any of the supplies used here, drop me a line and I'll hook you up.

Thank you for stopping by today.  Until the next post .................... Cheers!!!

irene

All supplies used where from Stampin'Up.


Monday, January 21, 2013

Chalkboard Thank You

I'm still enamored with the chalkboard technique and can't stop using it on my cards.  I made some thank you cards to add to my stash.  I must say these turned out better than I expected.  I'm sticking to one of my crafting resolutions - do not hoard paper and embellishments!  I used new designer papers, buttons and ribbons.  So new, in fact, that they're not available to Stampin'Up customers until the 22nd when Sale-a-bration (SAB) begins.  And, they are not for sale!  These are a few of the free items you get during SAB

The first card is for my upline Patty Bennett.  Just a simple thank you card for all the support and encouragement she gives us.  Love how I can match the tangerine tango embossing powder with the tangerine buttons and the ribbons with the designer paper.


On the second card, I also used pool party card stock for the card base.  The Sycamore Street DSP, a free pack of designer papers from SAB, coordinates perfectly with pool party.  Love the contrast between rich razzleberry and pool party.


On the third card, I also used pool party and rich razzleberry colors but reversed the card stock and embellishment colors.  Same but different.


Another fun and easy project and so on trend!

Thanks for stopping by, until the next post............ Cheers!!!

irene


Supplies used are all from Stampin' Up.
From Sale-A-Bration:  Sycamore Street DSP, Sycamore Street Ribbon and Button Pack, Vintage Verses Stamp set.

Sunday, January 20, 2013

Swap Card - January Meeting

I changed my swap card for our January meeting.  I decided that my original layout posted HERE was a little busy and went with a more simple layout.  What do you think?


Our group meeting was yesterday.  Guess who won the best card?  My card got the most votes and won first place!   I was so excited, two meetings in a row that I snagged the best card.

Patty Bennett was so generous with the prizes.  I won the Flower Fair Bundle from Stampin'Up's Spring Catalog.  This is a Simply Scrappin' Kit with the coordinating 8x8  Designer printed ring album.


I also won one of the door prizes.  I got the Sinply Sent Happy Hello card kit.


All in all it was a great day.  Great time with a group of talented and generous women.  Watch out for future projects made with my prizes.

Until the next post......................... Cheers!!!

irene

Tuesday, January 15, 2013

Gift Card or Cash Holder Cards

I'm happy to report that I haven't broken my crafting resolution - day 14 and I'm still at it.  My recent task was to sort and organize my card stocks.  I didn't realize that I have over one hundred different colors of card stocks.  Yikes!  Maybe my son's old elementary school can use some cardstocks.

I was getting sick of filing cardstocks when I had a 'light bulb' moment. Why not make something with them instead of spending time putting them away!  Something simple.  Check it out, here are some of the cards I made.


I used this same design to make some last minute cash and gift card holders for Christmas.  The inside has a pocket to hold cash or a gift card.


So far I have completed fourteen cards!  Most of them are nice.  Hehehe.  Can you tell I love flowers?


\


I think this project was a success.  I'm now planning the next one, a stack of Thank You cards.  The goal is to reduce my stash significantly in the next couple of months.

Thank you for stopping by.  Until the next post............... Cheers!!!


irene


Saturday, January 12, 2013

Swap Card - Faux Chalk Art

For my January 19th group meeting I decided to swap a card using the faux chalk art technique.  I love how my first chalkboard card turned out, posted HERE, that's why I wanted to try it again.

First step is deciding which stamp set to use.  I had a pretty good idea of the design and I need stamps that will work together and will fit in the layout.  With clear stamps, I was able to place all the stamps at once on a clear block.  This enabled me to stamp all the images at the same time.  I used images from five different stamp sets, that's a lot.

Another thing I did was cut the stamps to make them fit the design.  For example, the top stamp was originally "YOU'RE SUCH AN AMAZING" I cut out "SUCH AN" because I only need "YOU'RE AMAZING" for this card.  Same thing with the brackets, they're originally about an inch apart and I cut them in half so I can use them separately.


I used Versamark and white embossing powder to heat emboss all images.  Here is my starting point.


I added borders and lines using a white pencil.  I played with colored pencils for highlight but I wasn't getting the "pop" I had in mind.  In the end, I went with tiny punch flowers in rose red to match my card base.  I sponged white ink on the flowers to tone down the color a little bit.  TIP:  Sponge the cardstock with white ink before punching your flowers to save time instead of sponging punched tiny flowers one by one.

Final step is to sponge white ink all over the card to simulate chalk dust.  If you sponge the ink before adding the lines or any other doodle with the pencil, the sponged ink slightly resist the pencil and your lines or doodles are muted.  I personally like the lines sharp and crisp to begin with and then muted with sponging.

Here's the completed card.  I'm glad I was able to meet the 10-minute or less criteria.

UPDATE:  I changed my mind on the design and didn't swap this card, instead I swapped THIS


Here's what I played with before I got to the final card above.


Now I just need to do twenty five more and I'll be all set for the meeting.

Thanks for stopping by today,

Cheers!!!


irene

Supplies used were all from Stampin'Up including stamps, inks, card stock and punches.
Stamp Sets:  Amazing Family, Make A Wish and Ciao Baby from the 2013 Spring Catalog
                    Vintage Verses and Pretty Petites from the 2013 Sale-A-Bration Catalog

Friday, January 11, 2013

Crafting Resolution #2 Designer Cuts

The next card kit I'm going to complete is also from Stampin'Up called Designer Cuts.  This is a set of 8 laser cut cards.  I decided on real simple layout to highlight the delicate cut outs.

I could not resist making Valentine cards with the heart laser cut cards.  I cased a card I saw a while ago.  It's stunning and oh, so easy.  I made two of these.  The red glimmer paper really makes the cut out heart shine.


The next card can also be for Valentine.  For this one, I followed a tutorial by my upline Patty Bennett.  I used vellum colored with markers and attached it behind the cut out heart.  It's like stained glass when light shines through it.

The close ups.


I haven't done the other laser cut design.  Hopefully, I'll get to them next week and cross them off my to do list.  I'm currently focusing on my swap for my January 19th group meeting.  I'm still playing with layouts and designs and trying to finalize one that will meet the 10-minute criteria.

Until the next post..........Cheers!!!

irene